Frequently Asked Questions
Search for answers for questions everybody has about vinyl wraps, installation and other questions you may have. If you don't get an answer for your question, email us or call us, we are glad to help out and answer any vinyl wrap related questions and concerns.
About Car Wrap Vinyl Films
This is a tricky question, because there are a lot of factors especially once it is installed.
The vinyl films themselves will last anywhere from 3 to 7 years depending on the environment.
Generally the stronger the sun and the more your car is outside under the sun the less the vinyl will keep it’s color brightness and may start to fail or crack sooner.
If you live in Southern United States like California, Florida, Texas, etc. your vinyl film will last about 20-30% less due to the strength of the sun. This is true for all vinyl films no matter of the manufacturer. This is also true for paint. Colors that have a high content of red pigment will last the least as red pigments fade the quickest from all colors. These colors are Red, Purple, Yellow, Pink, Copper.
The other determining factor is the quality of the installation. Good installations will elongate the wrap look and feel and won’t fail by curling or peeling back.
Style durability in years:
Matte, Gloss, Liquid Metal, Metallic Sparkle, 3D Carbon Fiber, TrueR Carbon Fiber, TechArt Carbon Fiber, Brushed, Camouflage, Candy Diamond, Snake Skin, Wood Grain, Paint Protection Film: 5-7 years
Holographic Chromes: 3-5 years
fading occurs faster the closer you are to the equator (the more south you are)
Satin Chrome: 4-6 years
Standard Chrome: 1-3 years - no UV protection on this film
Headlight Tint: 3-5 years
No, the vinyl films we sell have a non-permanent adhesive that makes the vinyl wrap removable.
A wrap typically last for 3-7 years depending on the style of material used, conditions in which the car is driven, how much it is driven and where it’s stored; the amount & strength of sun it gets.
The vinyl wrap film can be removed without damaging the paint, returning the car to its original color and condition. You may get some glue residue after removal, but that can easily be removed with a glue remover (rubbing alcohol) or simply rubbing it off with your finger.
Normally a vinyl wrap should be removed after 7 years as it can may damage the clear-coat and even the paint if left on for longer.
There could be problems if the car was repainted or re-sprayed or the paint condition at time of installation was already damaged or of poor quality (like some commercial vehicles' factory paint). There is no guarantee that vinyl wrap will not do any damage and may not peel off paint when removed. This is true for all brands of vinyl wraps.
Gives your vehicle a unique one-of-a-kind look and protects your paint against fading, scratches and chips!!
- Vinyl car wraps protect your OEM paint and are 100% removable.
- Adds to the resell value of your car. When you remove it, your paint is in the same condition as on the day it was wrapped. Thus adding to the resale value by having flawless paint on your car. A repainted car normally decreases the value of your vehicle due to concerns over possible previous accident(s).
- You can restore the car to it’s original color by removing the wrap.
- Warranties and/or lease agreements remain valid. Painting can void warranties and is not a lease option.
- Cost for a vinyl vehicle wrap is considerably less (nearly half) than a comparable paint job.
- Many of the styles can not be reproduced by paint.
- Vinyl car wraps wear as well as, or better than paint – when properly cared for. Think of it like a skin for your laptop or a silicon cover for your phone. The vinyl can take a beating protecting the vehicle’s paint underneath.
- Vinyl car wraps come in many colors and can have a matte, semi-gloss, gloss, brushed steel, carbon fiber, matte metallic, chrome and even leather-like finishes.
- Expensive, color-matching paint fees are unnecessary for scratches or accident vehicles; just re-wrap the section that needs repair.
- It’s difficult to tell it’s not paint.
- You don’t have to wrap your entire car; you can just do your hood, roof, mirrors, stripes, etc.
- Matte-paint jobs can be brittle and chip easily, while vinyls are more durable and harder to scratch. In the event that repairs are needed, the part that was damaged can be easily replaced, providing a perfect match.
- Hides scratches, small chips and “freshens” the look of your vehicle.
What can you wrap?
Simply, anything the vinyl will stick to, both exterior and interior as well as marine and architectural applications.
This can actually be a tricky question that sometimes only answered when tried out… having said that we can confidently say that our vinyl films will stick to any painted surface on a vehicle and most smooth non-porous materials (bare metal, plastic, etc.)
It will not stick to some interior vehicle surfaces, such as rubber (soft or hard), leather, and some other non-painted, ribbed or in other ways non-smooth plastics.
The best thing is if you are not sure to order a large sample (5’x1′) and try to stick it to your target surface to see how well it holds. If it doesn’t hold at all, you can’t wrap it, but even if it holds lightly, install it and squeegee it over the surface then wait overnight then see how well it holds. The glue needs at least 12 hours to set itself to it’s full grip (tack).
The short answer is NO. That is not what vinyl wraps are intended for.
Vinyl wrap film is pre-colored at a specific color that are not OEM car colors, but colors that manufacturers come up with.
Car wraps are designed to change and/or replace the color of your vehicle, not to match it!
Vinyl wrap films are made by mixing pre-mixed dye with the plastic material (PVC based) that will be made into the wrap vinyl. For each batch – vinyl is made in a very large 2000 feet or larger rolls – color gets mixed and then added.
Each batch, even for the same color may have a noticeable shade difference as it is not possible to get the exact same color mixed the exact same way every time.
Car Wrap Care
You would want to care for your vinyl wrap on the vehicle the same way as for your car paint.
Hand washing is always the best and safest choice!
Only touchless car washes are recommended. Car washes that have the rotating brushes may lift and remove the vinyl!
1. Flush the wrap with water to remove loose dirt particles.
2. Use a mild liquid detergent and water mix to wash the wrap with a soft brush,
sponge or rag.
- wash going from top to bottom
- only scrub if absolutely necessary
- after applying the cleaning solution, keep a steady stream of water flowing on the
wrap to wash away dirt particles
3. Rinse the entire vinyl wrap thoroughly with clean water.
4. Dry with rags or for Gloss vinyl wraps it may not be necessary.
Try to wash your wrapped car regularly preferably by hand, just like you would a nice paint job.
Hand Wash – Wash whenever the car appears dirty. Contaminants allowed to remain on the vehicle wrap may be more difficult to remove during cleaning.
- Rinse off as much dirt and grit as possible with a spray of water.
- Use a wet, non-abrasive detergent such and a soft, clean cloth or sponge.
- Rinse thoroughly with clean water. To reduce water spotting, immediately use a silicone squeegee to remove water and finish with a clean microfiber cloth.
Automated Car Washes – Use touchless car washes (car wash using water jets only without brushes) if you don’t have time for a hand-wash. Brush-type car washes are not recommended as they can scratch the film, cause edges to lift or chip, and dull the film’s appearance.
Pressure Washing – Although hand washing is the preferred cleaning method, pressure washing may be used under these conditions.
- Ensure the water pressure is kept below 2000 psi (14 MPa).
- Keep water temperature below 80°C (180°F).
- Use a spray nozzle with a 40 degree wide angle spray pattern.
- Keep the nozzle at least 1 foot (300 mm) away from and perpendicular (at 90 degrees) to the graphic.
- Important Note! Holding the nozzle of a pressure washer at an angle to the graphic may lift the edges of the film.
Difficult Contaminants – Soften difficult contaminants such as bug splatter, bird droppings, tree sap and similar contaminants by soaking them for several minutes with very hot, soapy water. Rinse thoroughly and dry. Spot clean the contaminants. Do not use rough scrubbing, dirty or abrasive tools, which will scratch the film. Wash and rinse off all residue immediately.
Fuel Spills – Wipe off immediately to avoid degrading the vinyl and adhesive. Then wash, rinse and dry as soon as possible.
Film Restoration – The following restoration recommendations will help keep your vehicle wraps looking their best.
- Avoid automated car washes when possible
- Do not use any abrasive polishes or cutting compounds
- Do not use any polishing or wax products on matte or textured films
- If there is wax or wax residue on the surface, remove with an all-purpose cleaner
- Before using cleaning products, always test and approve in an inconspicuous area
Power washing, or pressure washing, may be used. However, aggressive washing can damage the vinyl.
Excessive pressure during power washing can damage the vinyl by forcing water underneath the film.
Water lessens the adhesion of the vinyl to the vehicle allowing the film to lift or curl.
These problems are magnified by wind.
To avoid edge lifting or other damage to the vinyl film, follow these important steps:
- Use a spray nozzle with a 40 degree wide spray pattern.
- Be sure the spray nozzle includes a nozzle protector (tip guard).
- Use a maximum pressure of 1500 to 2000 psi.
- If the system is heated, limit the water temperature to 180°F (82°C) or less.
- Hold nozzle at least 12 inches (300 mm) away from and perpendicular (90 degrees +/- 10) to the vinyl.
- Do not direct the water stream at a sharp angle to the edge of the vinyl
Car Wrap Installation
Installation times vary according to the size of the car and complexity of the project. A vehicle with a lot of complex curves take a lot longer to do. When done by professionals, you are looking at 2 to 3 days that includes the wrapping and a rest period for the film (12 hours).
For DIY guys who do it alone or with little help, give it 2-3 full days to do the job.
If done by 2 people it can be done in 1.5-2 days depending on the size and difficulty of the vehicle.
Due to the nature of the adhesive of the vinyl and the complex curves to which it’s applied, there is a 12 to 24 hour “rest period” after the application to allow the film to fully adhere to the vehicle. In this rest period it is best not to drive the car as the wind pressure may peel back the vinyl before it can fully set. So, add this extra time to your installation time-frame.
The best way to calculate how much vinyl your vehicle needs is by this simple formula below:
note that all vehicle vinyl films we sell is 5 feet (1.52m) wide except for Architectural (4′)
length of your vehicle x 3 (for the two sides & the top of the vehicle from front to back)
+ extra for bumpers and mistakes (5′ to 15′ depending on complexity of car and your skill level)
always round up to the closest roll size
Example:
a 2016 Ford Mustang is 188 inches long:
(188″ x 3) + 10ft
= 47ft + 10ft
= 57ft
the closest roll size is a 5ft x 60ft roll so purchase a 5ft x 60ft roll
♦ Small size cars can be fully wrapped with 50 to 55 feet / 15 to 16.8 meters of vinyl.
example of vehicle sizes:
Audi A3 & A4, BMW 2 & 3 series, Mitsubishi Lancer, Subaru Impreza, VW Golf & Beetle & Jetta, Hyundai Elantra, Nissan Sentra, Mercedes C-class
♦ Midsize cars can be fully wrapped with 60 to 65 feet / 18.3 to 19.8 meters of vinyl.
examples of vehicles:
Chevrolet Camaro, Corvette, Ford Mustang, Ford Fusion, Toyota Camry, Honda Accord, VW Passat & CC, Nissan Maxima/Altima, Audi A5 & A6, BMW 5 series, Mercedes E-class, Hyundai Sonata,
♦ Full-size cars; small SUVs, small trucks & small vans need 65 to 75 feet / 19.8 to 22.9 meters of vinyl
examples of vehicle sizes:
Audi A7 & A8, Ford Taurus, Chevrolet Impala, BMW 7 series, Mercedes limousines & S class, Hummer 3, 4Runner, FJ Cruiser
♦ Full-size SUVs, trucks & minivans 75 to 100 feet / 22.9 to 30 meters of vinyl
examples of vehicle sizes:
Suburban, Escalade, Land Rover, Cayenne, Hummer, H2, Voyager, Town & Country, Sienna, Routan
WrapCut® Application Process
Step One
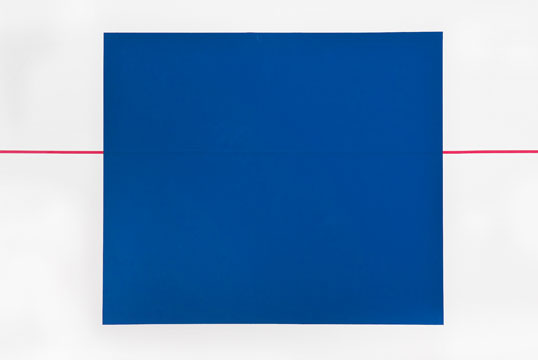
Apply WrapCut to the surface with the filament (tape edge) positioned on the desired trim line. Leave about 4 inches of tape exposed beyond the edge of the film so that the cutting filament can be located. Press both the film and tape down firmly to the surface.
Step Two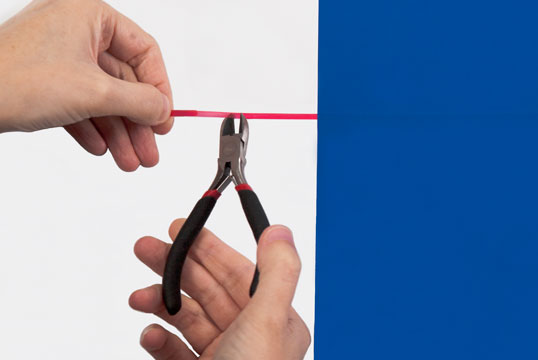
To create a pull tab, use a cutting tool to make a cut or incision in the tape approximately 1 to 2 inches from the end of the tape. Do not cut through the filament.
Step Three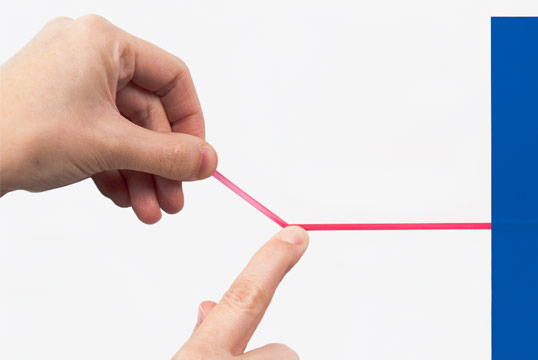
Placing a finger on the tape where the cut was made, tug the end piece of tape, freeing the end piece of the tape to create a pull tab.
Step Four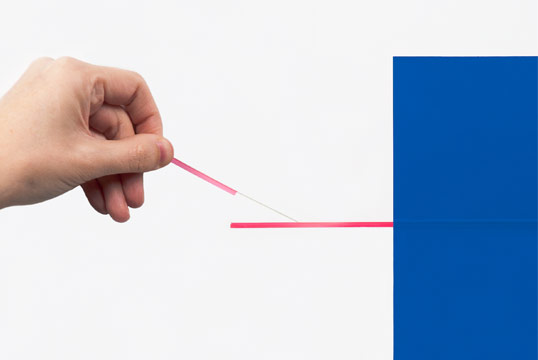
Using the pull tab, pull the bare filament free from the tape and then in the direction of the vinyl right up to the edge where the cutting will begin.
Step Five
While pressing the film down at the edge where the filament enters, give the filament a quick tug to begin cutting through the vinyl.
Step Six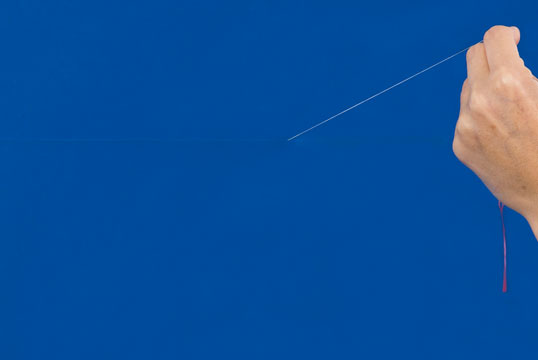
Continue pulling the filament with a steady motion along the edge of the tape and at a 45 degree angle towards the direction of the trim line.
Step Seven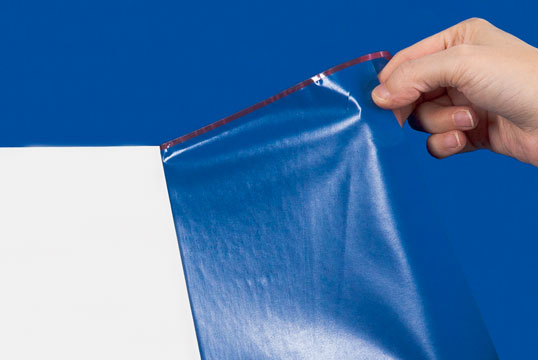
This picture shows half of the tape being removed simultaneously with the film. When the cut is made, the filament cuts the tape into two as well. Under each side of the cut under the two vinyl pieces.
Step Eight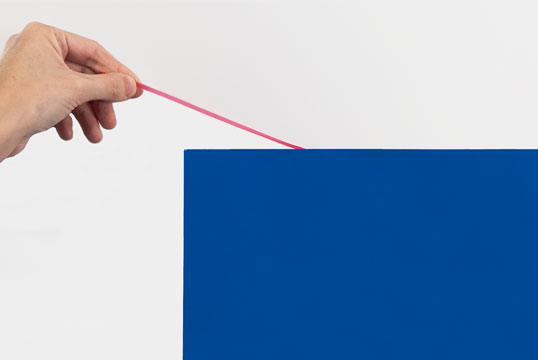
This picture shows the removal of the other half of the tape from underneath the cut vinyl. Make sure you remove this one too as it will cause premature failure of the wrap if left under the vinyl. WrapCut tape is strong, allowing for easy removal from beneath the film without damaging the film’s edge.
Follow this link to the article that breaks down the steps necessary from beginning to end to fully wrap a vehicle with car wrap vinyl film.
This is the method to install Vvivid vinyls. The basics are the same for all vinyl from different manufacturers, but this guide is especially written for Vvivid vinyl wrap films. It is geared towards Gloss, Matte, Carbon Fiber, Brushed and similar finishes.
The article breaks the process down into these 4 parts:
- PART ONE: tools, application environment & storage
- PART TWO: pre-wrap preparation, cleaning
- PART THREE: application, wrapping the car with vinyl
- PART FOUR: detailing, corners, edges, post-heating & finishing details
#1. Paint of your vehicle
Make sure you know or find-out about whether you car has original OEM paint on it or if it was repainted. If the paint is very old, damaged or has been fixed (patched) there is a chance that the vinyl will pull the clear-coat and/or paint off when removed. If the car was repainted with low quality, inexpensive method the chances are higher that the paint will be pulled off when removing vinyl, especially if removed incorrectly.
You can avert these problems by making sure you follow the vinyl removal technique as explained in our install guide. This technique will greatly reduce the chance of damaging the paint but is still not guaranteed by the vinyl manufacturer.
CWS nor any vinyl manufacturer will guarantee against paint damage as it is due to factors unrelated to the vinyl, glue of the film or any other aspects of manufacturing vinyl wraps or selling films to you.
#2. Defects, damage, stone chips, scratches on paint
Vinyl can only hide surface scratches and very small rock chips as it is fairly thin and acts like a “skin” on top of your vehicle. The style of car wrap and the color also effect how it hides or shows defects. Vinyl wraps that have a pattern will hide things the best way. These would be 3D Carbon Fiber, TrueR 4D Carbon Fiber, TechArt 5D Carbon Fiber, Brushed Aluminum, Gloss Metallic Sparkle, Snake Skin and Wood Grain vinyl wraps. Matte and Satin styles will show the most. Darker colors and white will hide the best.
Make sure that you also clean off dried/caked on dirt from the car. Sometimes it is hard to see until you put the vinyl on and it protrudes like a bump from under the film. Before vinyl wrapping a section of your car, drag your hand across it to feel for any protrusions that you will have to get rid of for a nice unblemished finish. We recommend clay barring for the smoothest best surface preparation.
#3 Rust
Rust that has eaten through the paint has to be fixed first, as the vinyl wrap will not stick to rust. It is also recommended to fix any rusted areas that are bubbling up under the paint, because it will look the same once the car is wrapped with vinyl film and won’t stop it from continuing to rust. Rust will continue to spread and eat away at your car if it is not gotten rid of, whether you wrap it in vinyl or not.
When rusted areas are patched it is best to add a layer of paint or clear coat as the vinyl will stick to it better than to filler or primer. Wait at least a few days (best to wait a week) for the paint to off-gas, to avoid bubbling of the vinyl from the off-gasing of the freshly painted surface.
Once your car is wrapped in vinyl and you have no rust under it, it will keep it safe from surface rust and stone chips, scratches that could cause rusting from the outside.
Yes!
You can vinyl wrap the interior of your car with our amazing styles and colors.
It is only possible to wrap parts that are hard and not covered in fabric and/or leather materials.
Usually the areas that you can cover are the dashboard (instrument panel & glove box), console, center console & doors (areas that are hard plastic or wood).
The architectural vinyl wraps; wood grain, leather, snake skin and velvet films are ideal for that extra touch to make your interior look exquisite. Carbon Fiber vinyl films are also very popular and makes the interior look sporty.

